


Table of Contents
What is a Dormer?
A Dormers installation is a structural element added to a roof to increase the usable space and enhance the aesthetic appeal of a building. This architectural feature consists of a windowed extension that projects vertically from the plane of a sloping roof. Dormers are often built to add more living space, bring in natural light and air, and enhance a home’s appearance.
There are various types of dormers, including gable dormers, hipped dormers, shed dormers, eyebrow dormers, and more, each suitable for different roof styles and design preferences. By adding a dormer, homeowners can increase the square footage of their living area, create attic space for storage or additional rooms, and bring in extra light to brighten up their interiors. Not only do dormers serve a functional purpose, but they also contribute to the visual appeal and architectural character of a property.

Benefits of Installing a Dormer
Installing a dormer in your home can provide a range of benefits. One of the main benefits is the increase in living space. By adding a dormer, you can create additional square footage in your home. This extra space can be used for various purposes such as a home office, a bedroom, or even a playroom.
Another advantage of installing a dormer is the increase in natural light. Dormer windows bring in ample sunlight, brightening up your interior and creating a more open and inviting atmosphere. With more natural light, you can reduce the need for artificial lighting during the day, saving on energy costs.
In addition to increased space and natural light, dormers can greatly enhance the curb appeal of your home. They add visual interest to the exterior and can transform an ordinary roofline into a more visually appealing feature. This can improve the overall aesthetic of your home and potentially increase its value.
Furthermore, dormers also improve ventilation in your home. With the addition of windows, fresh air can circulate more easily, creating a healthier and more comfortable living environment.
Frames and Capping
Overall, the benefits of installing a dormer include increased living space, more natural light, improved curb appeal, and better ventilation. Whether you’re looking to create additional space or enhance the overall look of your home, a dormer installation can be a worthwhile investment.
Types of Dormers Installation
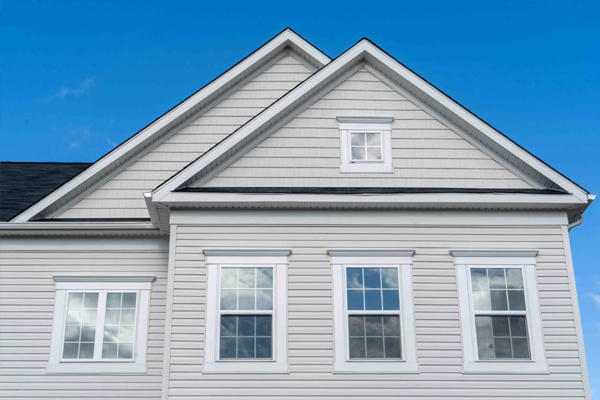
Dormers come in various styles and designs, each offering its unique architectural appeal and functionality. One common type of dormer is the gable dormer, which features a triangular roof and vertical walls. This type of dormer is popular for its ability to add extra living space and enhance the aesthetic appeal of the home’s exterior.
Another type is the shed dormer, which has a single sloping roof and vertical walls. Shed dormers are often used to maximize attic space and provide additional headroom. A hipped dormer is characterized by a roof with sloping sides, making it a suitable choice for homes with hipped roofs. This type of dormer adds both charm and character to the overall design. Other types of dormers include eyebrow dormers, barrel dormers, wall dormers, flat dormers, and more. Regardless of the type, installing a dormer can greatly enhance the functionality and visual appeal of your home.

Gable Dormer
A gable dormer is the most common and popular type of dormer, known for its distinctive appearance and functional design. It features two sloped sides that meet in a peak, creating a triangular shape. The walls of a gable dormer jut out from the main roof, providing additional space and natural light.
One of the key features of a gable dormer is the valleys created where the main roof and dormer roof meet. These valleys are essential for effective water drainage and to prevent water damage.
Gable dormers are versatile and can be constructed on various types of roofs, including gable roofs and hipped roofs. They are also compatible with different building materials, such as vinyl siding, wood frames, or even masonry.
This type of dormer not only enhances the aesthetic appeal of a home but also provides practical benefits. By adding a gable dormer, homeowners can increase the square footage of their living space, create additional attic space, or even accommodate a new room or bathroom.
In terms of average cost, gable dormers are relatively affordable compared to other types of dormers, making them a popular choice for homeowners looking to add both visual appeal and functionality to their homes.
Overall, gable dormers are valued for their curb appeal, natural light, and the ability to transform an exterior wall into a stunning architectural feature. With their versatile design and wide range of benefits, gable dormers are an excellent option for homeowners looking to enhance their home’s overall appeal and increase their living space.
Hip Dormer
The hip dormer is another popular type of dormer that adds both visual appeal and functionality to a home. Unlike the gable dormer, the hip dormer features a hipped roof, which means that the slopes of the roof meet and slope downward away from each other, creating valleys where the dormer roof and the main roof meet.
One key feature of the hip dormer is the sloped roof sheathing and roofing materials that are present on all three sides of the dormer. The joining point of these slopes is typically over the center of the dormer, creating a seamless and cohesive look.
The hip dormer not only enhances the aesthetic appeal of a home but also provides practical benefits. The sloped roof design allows for effective water drainage, preventing water damage and maintaining the integrity of the dormer. Additionally, the hipped roof offers architectural variety, making it compatible with different building materials and styles.
When considering dormer installation, it’s important to evaluate the various types of dormers available, including the hip dormer. By understanding the unique features and benefits of each type, homeowners can make an informed decision to enhance their home’s curb appeal and maximize natural light in their living spaces.
Eyebrow Dormer
An Eyebrow Dormer is an architectural element that adds visual appeal and architectural interest to the exterior of a building. Unlike other types of dormers, the primary purpose of an eyebrow dormer is not to provide additional interior space, but rather to enhance the overall aesthetic of the structure.
One distinctive characteristic of an eyebrow dormer is its curved roof, which gently slopes and blends into the existing roofline. This rounded roof design gives the dormer a unique and eye-catching appearance. In most cases, eyebrow dormers do not have side walls, further emphasizing their distinctive shape.
Eyebrow dormers are often used in older or historic homes, adding a touch of charm and character. They can be found in various architectural styles, including Colonial, Victorian, and Cape Cod. The rounded roof of an eyebrow dormer softens the lines of the building and creates a graceful and inviting look.
While eyebrow dormers do not typically provide additional interior living space like other types of dormers, they can still have a significant impact on the overall aesthetic of a building. Their visual appeal and architectural interest make them an attractive addition to any home or structure.
Preparation for Installation
Preparation for Dormers Installation:
Before beginning the installation process for dormers, there are several important steps that need to be taken. First and foremost, it is crucial to assess the structural integrity and feasibility of adding dormers to the existing roof. This may involve consulting with a professional contractor or architect to determine if the roof can support the additional weight and if any reinforcements or modifications are necessary.
Once the feasibility is confirmed, the next step is to obtain any necessary permits or approvals from local authorities. Each region may have specific guidelines or regulations for dormer installation, and it is essential to comply with these requirements to ensure a smooth and lawful process.
Another crucial aspect of preparation is to carefully plan the design and layout of the dormers. Consider factors such as the desired size, style, and placement of the dormers to complement the overall aesthetic of the home. Additionally, consider the functionality and purpose of the dormers, such as creating additional living space or increasing natural light.
Lastly, make sure to gather all the necessary materials, tools, and equipment for the installation process. This may include roofing materials, framing materials, windows, and any additional components required for the specific type of dormer being installed.
By thoroughly preparing for the installation of dormers, homeowners can ensure a successful and visually appealing addition to their homes.
Assessing the Space Needed for Installation
Before installing dormers, it is essential to assess the available space to determine the size and design that can be accommodated. This assessment involves considering the existing structure and available attic space.
First, measure the existing attic space to determine the square footage available for the dormer. This will help determine how much additional space can be created. Additionally, consider the desired purpose of the dormer, such as creating an additional bedroom or office, as this will impact the size requirements.
Next, assess the existing roof type and pitch. Different types of dormers work better with certain roof styles, so it is important to choose a dormer design that complements the existing roof. Consider factors such as aesthetics and functionality when selecting a dormer style.
Consider any obstacles or limitations, like plumbing or electrical systems, that could affect the position or size of the dormer. These considerations will ensure that the installation process goes smoothly without any complications.
Homeowners can determine the right size and design for their dormer installation by assessing the existing structure, attic space, and any limitations. This will ultimately result in a successful and aesthetically pleasing addition to the home.
Selecting the Type of Material for the Frames and window Capping
When it comes to selecting the type of material for frames and capping, there are several options available, Garage door frames each with its own unique characteristics and benefits. Choosing the right material for your door and window frames is important for both weatherproofing and improving the look of your home.
One popular choice for window capping materials is aluminum. Aluminum capping offers durability and low maintenance requirements, making it a practical option for homeowners. It is also resistant to water damage and provides a sleek, modern look.
Vinyl is another commonly used material for frames and window capping. It is known for its versatility, affordability, and ease of maintenance. Vinyl frames and capping are resistant to rot, peeling, and fading, making them a popular choice among homeowners.
Cedar is a natural wood material that offers a traditional and rustic look. It is highly resistant to decay and insects, making it suitable for outdoor applications. However, cedar requires regular maintenance, such as staining or sealing, to maintain its natural beauty.
Fibre cement is a composite material made from cement, sand, and cellulose fibres. It is a durable and low-maintenance option for frames and capping. Fibre cement offers excellent resistance to rot, insects, and fire, making it a reliable choice for homeowners.
In addition, preservative-treated wood trim is another option for frames and capping. This material undergoes a treatment process to enhance its resistance to decay and insect infestations. Preservative-treated wood trim provides a natural and timeless look.
Consider durability, maintenance, appearance, and budget when choosing frame and cap materials of window capping. Assessing these factors helps you make an informed decision that meets your needs and improves the appearance of your home.
Cost Considerations Beforehand
Before embarking on a dormer installation project or window replacement, it is essential to consider the various cost factors involved. To have a successful and cost-effective installation, it is important to assess the space required, choose suitable materials, and get the necessary permits if needed.
The amount of space required for a dormer depends on the intended use and the desired aesthetic appeal. Larger dormers will provide more living space and natural light but will also increase the overall cost. It is important to carefully evaluate your needs and budget to determine the optimal size.
Furthermore, the choice of materials for the dormer’s exterior walls, roof, and window frames and wooden frames will greatly impact the overall cost. Different materials, such as wood or fibre cement, have varying costs and maintenance requirements. It is advisable to choose materials that not only fit your budget but also offer long-term durability and aesthetic appeal.
Additionally, obtaining any necessary permits before starting the installation process is crucial. The cost of permits can vary depending on the location and the complexity of the project. Consulting with local authorities and completing all required paperwork and fees is important to avoid legal issues and extra expenses later on.
On average, the cost of dormer installation can range from $15,000 to $50,000, depending on various factors such as the size, type of dormer, materials used, and labor costs in your area. To understand the average cost of your roofing project, it is advisable to get quotes from several reputable contractors.
To stay within your budget and get the desired look and functionality, homeowners should assess the required space, choose the right materials, secure permits, and get several quotes for dormer installation.
Drafting Plans and Obtaining Permits (if necessary)
When installing a dormer, one of the crucial steps is drafting plans and obtaining permits. The process involves submitting detailed architectural and structural drawings that comply with local laws and regulations.
To begin, it’s essential to check with the local planning authority to determine if a dormer permit is required. The price of a dormer permit can vary depending on the location and local regulations. On average, it can cost approximately $1,160.
Drafting plans for a dormer typically involves creating architectural and structural drawings that showcase the design and construction details. These plans should include dimensions, materials, and any other specific requirements mandated by the local authorities.
Once the plans are complete, they must be submitted to the planning authority for review. Check with the local authority for an estimate of the time it takes to get a permit.
Getting the proper permits makes sure that the dormer installation follows local building codes and rules, guaranteeing safety and compliance with standards. Failing to obtain the proper permits can result in legal issues and potential fines.
Obtaining permits to install a dormer is an important step in the process. Thoroughly research local laws and work closely with the planning authority to comply and install smoothly.
Safety Measures to be Taken During Installation
Safety is of utmost importance during the installation of dormers to prevent accidents and injuries. Following safety protocols not only protects the workers but also ensures the successful completion of the project.
To ensure safety during dormer installation, several measures should be taken. First and foremost, it is essential for workers to wear appropriate protective gear, such as hard hats, safety glasses, and steel-toe boots. This safeguards them from potential hazards, such as falling debris or tools.
Using proper tools and equipment is equally important. This includes using sturdy ladders or scaffolding that are securely positioned and have a stable base. Workers should also use the correct tools for the job to minimize the risk of accidents or damage.
Securing ladders and scaffolding is crucial to prevent falls. They should be placed on level ground and firmly positioned against the wall. Additionally, workers should utilize safety harnesses or fall protection systems when working at heights.
Working on a sloped roof can be tricky. To stay safe, it’s best to have a partner with you. This is especially important when dealing with heavy materials or tools. This helps provide added stability and reduces the risk of accidents.
By implementing these safety precautions, workers can ensure a safe working environment during the installation of dormers. Prioritizing safety not only protects the individuals involved, but also promotes a successful completion of the project.
The Installation Process
The installation process of dormers involves several steps to ensure a safe and efficient installation. Always wear safety gear and use the right tools and equipment to reduce the chances of accidents.
Securing ladders and scaffolding, especially on sloped roofs, is paramount to prevent falls. Working with a partner when handling heavy materials or tools provides added stability.
With these precautions in place, the installation process can proceed smoothly, allowing homeowners to enjoy the benefits of dormers – such as increased natural light, additional living space, and enhanced aesthetic appeal. Whether it’s gable dormers, eyebrow dormers, or wall dormers, professional installation ensures the longevity of the dormers while adding value to the overall property.
Removing the Existing Roofing/Wall Materials from Area of Installation
When installing dormers, it is essential to remove any existing roofing and wall materials from the area of installation. This step is crucial to ensure a clean and proper surface for the dormer installation process. Here are the steps to effectively remove the existing materials:
1. Begin by inspecting the area and identifying any damaged or deteriorated roofing materials or wall sections.
2. Safely remove the roofing material using appropriate tools such as a pry bar or shovel. Start from the top and work your way down, carefully detaching the shingles or other roofing material.
3. Once the roofing material is removed, assess the condition of the underlying sheathing. Replace any damaged or rotted sections as necessary.
4. Similarly, remove any wall materials surrounding the area where the dormer will be installed. This may include siding, insulation, or other coverings.
5. Inspect the wall framing and repair or reinforce it as needed to accommodate the dormer installation.
6. Thoroughly clean the surface, removing any debris or dust to create a smooth and level area for the new dormer.
It is important to remove old or damaged materials to ensure a solid foundation for the dormer installation. By following these steps, you can prepare the area for a successful and long-lasting dormer addition to your home.
Preparing and Securing the Framing Structure
Preparing and securing the framing structure is a crucial step in the installation of dormers. The framing provides the structural support and stability necessary for the dormer to be integrated into the existing roofline seamlessly.
To prepare the framing structure, it is important to assess the area where the dormer will be installed and make any necessary repairs or reinforcements to ensure it can adequately support the additional weight. This may involve adding extra beams or joists to strengthen the existing framework.
Securing the framing structure involves properly anchoring the dormer to the roof and ensuring it is securely attached to prevent any movement or instability. This is typically done using metal fasteners and brackets that are specifically designed for this purpose.
In terms of cost, the framing of a roof can vary depending on factors such as the size and complexity of the dormer, the type of materials used, and the labor involved. On average, the cost of framing a roof can range from $8 to $16 per square foot.
To protect the wood frame of the dormer from weather damage and extend its lifespan, it is recommended to use aluminum capping. Aluminum capping acts as a barrier, preventing moisture from penetrating the wood and causing rot or decay. It also helps to maintain the aesthetic appeal of the dormer by providing a clean and finished look.
In summary, preparing and securing the framing structure is a critical step in the installation of dormers. It ensures the dormer is properly integrated into the existing roofline and provides the necessary support and stability. The cost of framing can vary, and aluminum capping is a recommended protective measure for the wood frame.