


**The Comprehensive Guide to Siding Installation: From Preparation to Maintenance** When it comes to enhancing the aesthetic appeal and functionality of your home, siding installation is a significant undertaking that requires careful planning and execution. This guide will walk you through the essential steps involved in the siding installation process, ensuring that you are well-prepared for each phase. Whether you are a homeowner looking to upgrade your property or a contractor seeking a detailed overview, this article will provide valuable insights into every aspect of siding installation.
Key Takeaways
- Thorough inspection and surface preparation are crucial before siding installation.
- Proper removal of old siding ensures a clean base for new materials.
- Accurate installation of corners, trims, and ventilation prevents future damage.
- Final cleanup and inspection guarantee a quality finish and durability.
- Regular maintenance extends the lifespan and appearance of siding.
A comprehensive pre-installation inspection is essential before beginning any siding installation project. This evaluation involves examining the exterior walls for structural damage, moisture infiltration, mold growth, or wood rot that could affect the new siding’s performance and longevity. Inspect the existing wall framing, sheathing, and insulation for defects that require repair prior to installation.
Proper preparation requires assembling the appropriate tools and materials for the project. Essential equipment includes measuring tools, levels, cutting implements, fasteners, and personal protective equipment.
Common siding options include vinyl (low maintenance, cost-effective), wood (natural appearance, requires regular upkeep), fiber cement (durable, fire-resistant), and metal (long-lasting, weather-resistant). Each material has distinct installation requirements, thermal expansion properties, and performance characteristics that influence the installation methodology and long-term durability of the siding system.
Removal of Existing Siding
Once the pre-installation inspection is complete, the next step is to remove the existing siding. This process can be labor-intensive but is necessary to ensure a clean surface for the new siding. Begin by carefully removing any trim or accessories around windows and doors to avoid damage.
Use a pry bar or a similar tool to detach the old siding panels without harming the underlying structure. As you remove the siding, take note of any damage that may be present beneath it. This could include rotting wood or compromised insulation that needs to be addressed before proceeding.
Proper disposal of the old siding is also important; check local regulations regarding waste disposal to ensure compliance. By meticulously removing the existing siding, you create a solid foundation for your new installation.
Surface Preparation

With the old siding removed, surface preparation becomes paramount. This step involves cleaning and repairing the underlying structure to ensure optimal adhesion and performance of the new siding. Start by inspecting the sheathing for any signs of damage or decay.
If you find any compromised areas, replace them promptly to prevent future issues. Next, clean the surface thoroughly to remove dirt, debris, and any remnants of old materials.
After cleaning, consider applying a moisture barrier if your home is in a region prone to high humidity or rainfall. This barrier will help protect against water infiltration and extend the lifespan of your new siding.
Siding Material Delivery
Once surface preparation is complete, it’s time to arrange for the delivery of your chosen siding materials. Coordinate with your supplier to ensure that all materials arrive on time and in good condition. It’s advisable to order slightly more material than needed to account for any mistakes or miscalculations during installation.
When the materials arrive, inspect them carefully for any defects or damages that may have occurred during transit. Check for color consistency and quality to ensure they meet your expectations. Proper storage of siding materials is also essential; keep them in a dry area and off the ground to prevent moisture absorption.
By managing this phase effectively, you can avoid delays and complications during installation.
Siding Installation Process
| Stage | Duration | Activities | What to Expect | Common Metrics |
|---|---|---|---|---|
| Preparation | 1-2 days | Remove old siding, inspect walls, repair damages | Noise and debris; possible minor disruption | Area cleared, old materials disposed |
| Measurement & Ordering | 1 day | Measure walls, order aluminum panels and accessories | Waiting period for materials delivery | Accurate measurements, lead time 3-7 days |
| Installation | 3-5 days | Attach aluminum panels, trim, and flashing | Noise from tools, workers on site, partial access restrictions | Panels installed per square foot, fasteners used |
| Finishing Touches | 1 day | Caulking, painting touch-ups, cleanup | Minimal disruption, final inspection | Seams sealed, paint coverage checked |
| Total Project Time | 5-9 days | All stages combined | Temporary inconvenience, improved home exterior | Square footage covered, labor hours |
The actual installation of siding is where your preparation pays off. Begin by measuring and marking guidelines on your walls to ensure that each panel is installed evenly and at the correct height. Starting from the bottom and working your way up is generally recommended, as this allows for better water drainage and prevents moisture from getting trapped behind the panels.
As you install each panel, use nails or screws appropriate for your chosen material. Ensure that each piece is securely fastened and overlaps correctly with adjacent panels to create a seamless appearance. Pay close attention to corners and edges, as these areas can be particularly vulnerable to water infiltration if not installed correctly.
Regularly step back to assess your work and make adjustments as needed to maintain a straight line.
Corner and Trim Installation

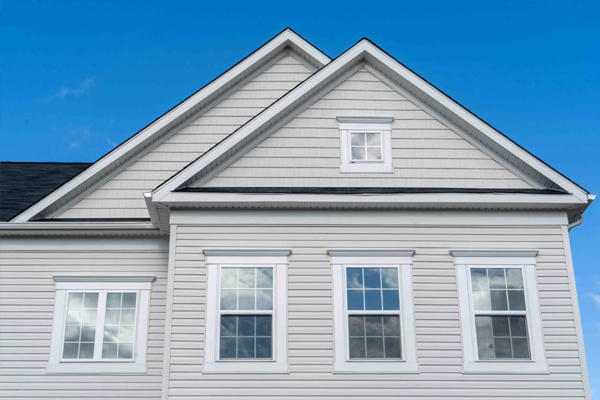
After the main panels are installed, it’s time to focus on corner and trim installation. Corners are critical areas that require special attention; they not only enhance the visual appeal of your home but also provide additional protection against weather elements. Use corner boards or trim pieces that match your siding material for a cohesive look.
When installing trim around windows and doors, ensure that it fits snugly against the siding panels. This not only improves aesthetics but also helps prevent water from seeping behind the trim. Caulking may be necessary in some areas to create a watertight seal.
Take your time with this step; well-installed corners and trim can significantly elevate the overall appearance of your home.
Window and Door Trim Installation
The installation of window and door trim is another vital aspect of completing your siding project. Properly fitted trim not only enhances curb appeal but also serves as an additional barrier against moisture intrusion. Begin by measuring each window and door frame accurately before cutting your trim pieces to size.
When attaching trim around windows and doors, use a level to ensure everything is straight and aligned correctly. Secure each piece with nails or screws, making sure they are flush with the surrounding siding. For added protection against water damage, consider applying caulk along the edges where the trim meets the siding and around window frames.
This extra layer of defense will help maintain the integrity of your home’s exterior.
Ventilation and Drainage Installation
Proper ventilation and drainage are essential components of any siding installation project. These systems help prevent moisture buildup behind the siding, which can lead to mold growth and structural damage over time. Begin by installing ventilation products such as soffit vents or ridge vents, depending on your home’s design.
Ensure that drainage systems are in place to direct water away from your home’s foundation. This may involve installing flashing around windows and doors or using drainage mats behind the siding panels. By prioritizing ventilation and drainage during installation, you can significantly extend the lifespan of your new siding while protecting your home from potential water-related issues.
Soffit and Fascia Installation
Soffit and fascia play crucial roles in both aesthetics and functionality when it comes to siding installation. Soffit covers the underside of eaves while fascia boards run along the roofline, providing a finished look to your home’s exterior. Begin by measuring and cutting soffit panels to fit snugly between rafters.
When installing soffit panels, ensure they are properly ventilated to allow airflow into the attic space. This helps regulate temperature and moisture levels within your home. For fascia installation, secure each board tightly against the roofline using appropriate fasteners.
A well-executed soffit and fascia installation not only enhances curb appeal but also contributes to overall energy efficiency.
Cleanup and Final Inspection
After completing all installation steps, it’s time for cleanup and final inspection. Remove any debris, excess materials, or tools from the worksite to leave your property looking pristine. A clean environment not only enhances safety but also allows you to assess your work more effectively.
Conduct a thorough inspection of all installed components, checking for any gaps or imperfections that may need addressing. Pay special attention to seams, corners, and trim areas where water could potentially infiltrate. If everything meets your standards, take pride in your accomplishment; you’ve successfully transformed your home’s exterior!
Maintenance and Care Tips
Once your new siding is installed, ongoing maintenance is key to preserving its appearance and functionality over time. Regularly inspect your siding for signs of wear or damage, such as cracks or fading colors. Cleaning your siding periodically with mild soap and water can help remove dirt buildup and maintain its aesthetic appeal.
Additionally, keep an eye on caulking around windows and doors; reapply as necessary to ensure a watertight seal. If you live in an area prone to severe weather conditions, consider scheduling professional inspections after storms to assess any potential damage promptly. By following these maintenance tips, you can enjoy a beautiful exterior while protecting your investment for years to come.
In conclusion, siding installation is a multifaceted process that requires careful planning, execution, and ongoing maintenance. By following this comprehensive guide from pre-installation inspection through final inspection and maintenance tips, you can ensure a successful project that enhances both the beauty and durability of your home’s exterior. Whether you’re tackling this project yourself or hiring professionals, understanding each step will empower you to make informed decisions every step of the way.
Don’t hesitate—start planning your siding project today!
When considering aluminum siding installation, it’s essential to understand not only the process but also how it can enhance your home’s overall appearance and functionality. For instance, you might find it beneficial to read about the guide to choosing exterior trim and color, which provides valuable insights on how to select the right colors and trims that complement your new siding, ensuring a cohesive and attractive look for your home.
Get Free Estimate (647) 560-9038
FAQs
What is aluminum siding?
Aluminum siding is a type of exterior cladding made from aluminum panels. It is used to protect and enhance the appearance of a building’s exterior and is known for being lightweight, durable, and resistant to rust and corrosion.
How long does aluminum siding installation typically take?
The installation time for aluminum siding varies depending on the size of the home and the complexity of the job. On average, it can take anywhere from a few days to a week to complete the installation.
Do I need to prepare my home before aluminum siding installation?
Yes, preparation may include removing old siding, cleaning the exterior walls, and making any necessary repairs to the underlying structure. The installation team will usually advise on specific preparations needed.
Will aluminum siding installation be noisy or disruptive?
Installation can involve some noise from tools and equipment, as well as minor disruptions around the home. However, professional installers aim to minimize inconvenience and complete the work efficiently.
Is aluminum siding installation weather-dependent?
Yes, installation is best done in dry weather conditions. Rain or extreme temperatures can delay the process or affect the quality of the installation.
Can aluminum siding be installed over existing siding?
In some cases, aluminum siding can be installed over existing siding, but this depends on the condition and type of the current siding. A professional assessment is recommended to determine the best approach.
What maintenance is required after aluminum siding installation?
Aluminum siding requires minimal maintenance. Occasional cleaning with water and mild detergent is usually sufficient to keep it looking good. Inspecting for dents or damage periodically is also recommended.
Will aluminum siding installation improve my home’s energy efficiency?
Aluminum siding itself does not provide significant insulation, but when combined with proper insulation materials underneath, it can contribute to improved energy efficiency.
Are there color and style options available for aluminum siding?
Yes, aluminum siding comes in a variety of colors and styles, allowing homeowners to customize the look of their home’s exterior.
Is aluminum siding installation cost-effective?
Aluminum siding is generally considered a cost-effective option due to its durability, low maintenance, and relatively affordable installation costs compared to other siding materials.